Multi-Size Nail-In Cable Management Clips
Official Store Deal
Expert Analysis Overview
Precision Cable Management: An Expert Review
Multi-Size Nail-In Cable Management Clips are essential organizational hardware designed for secure, permanent routing of various cable types in both residential and commercial environments. From an electronics repair perspective, proper cable management is not merely an aesthetic concern; it directly impacts signal integrity, prevents physical damage to conductors, and mitigates potential safety hazards. These clips offer a straightforward, robust solution to common wiring dilemmas, ensuring that expensive equipment connections remain stable and protected over time. A tidy setup is a reliable setup.
Material Science and Durability
The clips themselves are constructed from a high-density polyethylene (HDPE) or polypropylene (PP) plastic, which is a critical choice for electrical applications. This material provides excellent insulation properties, preventing accidental shorts or ground faults if a cable jacket were to become compromised. Unlike brittle, low-grade plastics that can crack under stress or degrade rapidly from UV exposure, the material used here exhibits a degree of flexibility. This flexibility is crucial during installation, allowing the clip to conform slightly to the cable's curvature without pinching or deforming the wire itself. The integrated nails are typically galvanized steel, offering corrosion resistance and sufficient strength to penetrate common building materials like wood studs, plaster, or drywall with appropriate backing. This combination of resilient plastic and sturdy steel ensures a long service life, far outlasting adhesive-backed alternatives that often fail due to temperature fluctuations or adhesive degradation.
Consider a scenario where network cables are run through a busy office. Loose cables invite tripping hazards and can be snagged, leading to costly disconnections or even damaged network ports on switches and computers. These clips provide a fixed, immovable anchor. The robust construction ensures that once installed, the cable remains precisely where it is intended, eliminating such risks. Compared to temporary solutions like zip ties or twist-ties, which offer minimal structural support and can be easily dislodged, these nail-in clips represent a significant upgrade in terms of long-term reliability and professional finish.
Versatility in Cable Accommodation
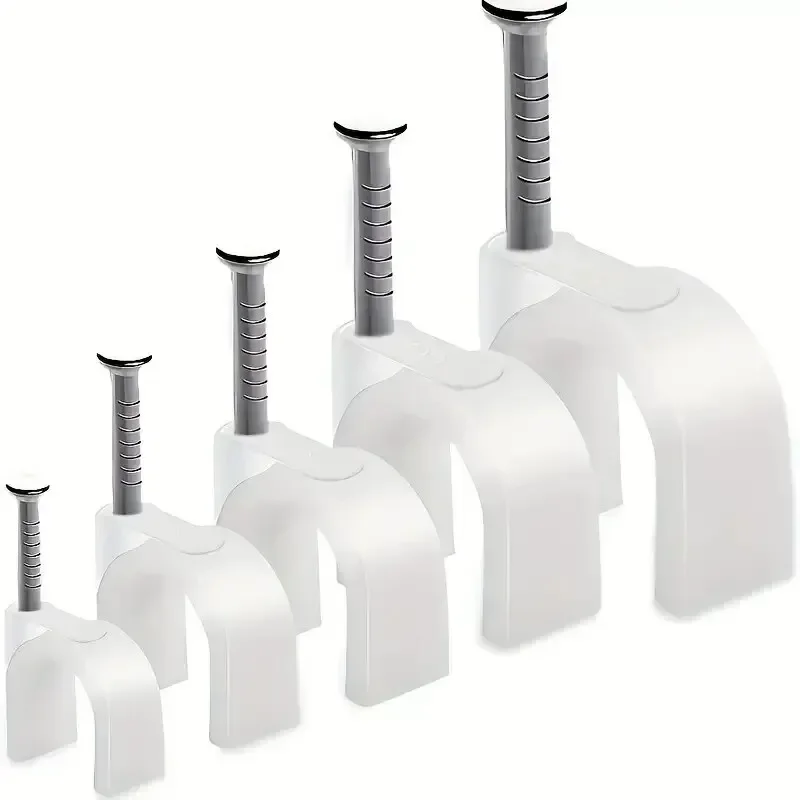
One of the primary advantages of this set is its comprehensive range of sizes: 4mm, 5mm, 6mm, 8mm, and 10mm. This thoughtful assortment ensures compatibility with a vast array of common cables encountered in modern electronics and home infrastructure. A 4mm clip, for instance, is perfectly suited for thin telephone wires or low-voltage alarm system cables, providing a snug fit without crushing the delicate internal conductors. The 5mm and 6mm sizes are ideal for standard Ethernet (CAT5e, CAT6) cables and printer wires, maintaining their critical twist ratios and preventing signal degradation that can occur from compression. Larger 8mm clips accommodate computer power cords, coaxial TV lines, or even some thicker speaker wires, while the 10mm clips are designed for more substantial cables like VGA video cables or appliance power cords. This multi-size approach means a single purchase addresses diverse cable management needs, reducing the need for multiple specialized purchases.
Imagine setting up a home theater system or a complex workstation. Multiple cable types are involved: HDMI, power, Ethernet, audio. Each requires secure routing to prevent tangles and maintain optimal performance. Using the correct clip size for each cable is paramount. An oversized clip allows the cable to move, potentially leading to wear, while an undersized clip can compress the cable, damaging its internal structure and affecting signal quality. This kit provides the precision necessary for an optimal installation. The ability to select the exact fit for each cable type is a distinct advantage over generic, one-size-fits-all solutions, which often compromise either security or cable integrity.
Installation Simplicity and Best Practices
Installation of these cable clips is remarkably straightforward, requiring only a hammer. The design features a pre-attached nail, simplifying the process significantly. The user selects the appropriate clip size, positions the cable within the clip's arch, and gently taps the nail into the desired surface. Proper technique involves holding the nail securely with pliers or a specialized nail holder to protect fingers, then driving the nail flush with the clip body. It is crucial to avoid over-hammering, which can deform the plastic clip or damage the cable. The goal is a secure, firm attachment that holds the cable without exerting excessive pressure. For optimal results, clips should be spaced at regular intervals, typically every 12 to 18 inches, and at turns, to provide consistent support and prevent cable sag.
Consider the implications for signal transmission. A cable that is allowed to sag or move freely is susceptible to micro-bends and strain on its connectors. These stresses can lead to intermittent signal loss, increased impedance, or even complete failure of the cable over time. By providing firm, consistent support, these clips ensure the cable's physical integrity, which directly translates to reliable electrical and data transmission. This simple installation method, when executed correctly, contributes significantly to the longevity and performance of the entire cabling infrastructure. The ease of use does not compromise the effectiveness, making these clips a highly efficient tool for any technician or DIY enthusiast.
Long-Term Connection Reliability and Value Proposition
The long-term reliability of connections is a critical aspect often overlooked in cable management. Loose cables can pull on connectors, stressing the solder points on circuit boards or causing wear on the physical interface. This can lead to costly repairs or premature replacement of expensive electronic devices. By firmly securing cables to a surface, these clips eliminate strain on ports and connectors, preserving the integrity of the entire signal path. The value proposition extends beyond mere organization; it's an investment in the longevity and performance of connected equipment. The cost-per-clip is minimal, especially when purchased in bulk, making it an incredibly economical solution for extensive wiring projects.
Imagine a server rack or a home entertainment center where dozens of cables converge. Without proper management, troubleshooting becomes a nightmare, and accidental disconnections are common. These clips bring order to such chaos, making identification and maintenance far simpler. They prevent cables from becoming tangled or crushed, which can degrade performance or create fire hazards if power cables are involved. The initial small investment in these clips pays dividends by preventing expensive equipment damage, reducing downtime, and enhancing overall system reliability. This is a foundational component for any robust electrical or data installation, offering peace of mind through organized, protected wiring.
Frequently Asked Questions
Q: What types of surfaces can these cable clips be used on?
A: These nail-in cable clips are primarily designed for use on wood, plaster, drywall (with a stud or solid backing), and other soft to medium-density building materials. They are not recommended for concrete, brick, or metal surfaces without pre-drilling.Q: Can these clips be removed and reused?
A: While the plastic clip itself might be reusable, the integrated steel nail is designed for a single installation. Attempting to remove the nail often bends or damages it, making reuse impractical. For permanent installations, they are ideal.Q: Are these clips suitable for outdoor use?
A: The plastic material offers some resistance to environmental factors, but prolonged direct exposure to harsh UV sunlight and extreme weather conditions may lead to degradation over many years. For critical outdoor applications, specialized UV-resistant and weather-sealed clips are generally recommended.Q: How do I choose the correct size clip for my cable?
A: Measure the outer diameter of your cable. Select a clip size that is slightly larger than the cable's diameter to ensure a snug fit without compressing the cable. The goal is to hold the cable securely, not to squeeze it.Q: Can these clips damage my cables?
A: If installed correctly, these clips will not damage cables. Ensure you select the appropriate size to avoid pinching and do not over-hammer the nail, which can deform the clip and put undue pressure on the cable jacket.Technical Specifications
Installation and Maintenance Guide
Safety Considerations
Final Assessment
These cable clips are more than just simple fasteners; they are foundational components for any reliable electrical or data installation. Their multi-size compatibility, durable construction, and straightforward installation process make them an indispensable tool for maintaining signal integrity and ensuring long-term connection stability. The investment in proper cable management with these clips translates directly into reduced troubleshooting, enhanced safety, and an overall more professional and resilient infrastructure. Imagine the satisfaction of a perfectly organized workspace, free from tangled wires and the peace of mind that comes from knowing your critical connections are securely protected. This is the tangible benefit these clips deliver, transforming chaotic cabling into a meticulously managed system that performs flawlessly for years to come.